Monday 15 November 2010

Hello all!

I really have  to apologise - i promised all sort and as yet haven't posted any of it. Well I got back from convention thinking I'd have a few quiet days - well it hasn't turned out that way. Instead another weekend has passed in a flurry of activity (plus a brief rest when we went to see Daniel Sloss at the Bloomsbury Theatre - a very funny young man!) and still no sign of a proper post.

So i'll put up some of the photo's and then hopefully after this weekend (in which we have my Mum visiting, a farewell dinner with my fellas parents before they leave to spend Christmas in Foreign Climes and a stall at a fair all day Sunday) it will calm down a little and i can get to writing out instructions for all of the bits I want to.

My swaps - made with the Ornament punch and the gorgeously soft Organza Ribbon.

My 3D Swaps - christmas tree ornaments - very delicate!

And all the amazing things i bought back with me, including the lovely Greenhouse Gala craft tote - which has hardly been away from my side since I got home!
Fingers crossed that I make it to next week, and then a bumper crop of posts shall be yours.

Tuesday 9 November 2010

A wee update

I'm home from convention. Sunday was a day off to let my poor brain recover - though it was so busy whirling with ideas I don't think it got any real rest - then straight back into it. Yesterday evening I did a small session with a local Brownie troop, making favour bags decorated with the Contempo Christmas set. All of the girls were wonderful and dare I say it, I think they enjoyed themselves. I picked up some more pointers as well for working with young crafters, so one step closer to being able to deliver top notch activities for childrens parties. I'm still very excited about them - there are so many wonderful bits and bobs in this years catalogue just perfect for amusing both children and their parents.

And so to Convention. It was so much fun - and so helpful. We got so many brilliant ideas from Shelly and Pam and the other staff members, and the standard of swaps I brought home with me was amazing! I just have to get them all out and photgraph them!

We also had some wonderful announcements - I promise that you will not want to miss January's promotion!

So my next post will be a round up of what happened, and as promised the how-to's for my own swaps, and a little peak at the lovely things I bought home with me.I'll also hopefully have some of the items i'm making for my stall later this month to show you, so watch this space!

Monday 1 November 2010

White Rabbits... and spotty ribbons and oodles of lovely papers

Happy 1st of November all of you!

Did you enjoy Halloween? I know my niece threw her annual bash with a few friends and though I've yet to hear the report on it, I'm sure she had a great time.
I missed the parties sadly - instead we had a quiet night and watched Cloverfield whilst eating candy floss (not necessarily the most comfortable of bedfellows, but candy floss is not to be passed up).
Next year I am determined to do something fun, Halloween being one of my favorite times of the year.

On to November though, and SU have brought out some Christmas goodies - and yes, I love them already - they are ribbons after all!

Time to get excited - and maybe think about hosting a party.


You can view the PDF here but basically, during the Christmas season, you can get a FREE spool of exclusive Stampin’ Up! ribbon when you purchase a Christmas gift-giving bundle.

There are 4 bundles to choose from - The Welcome Christmas Bundle features the Welcome Christmas stamp set and the EXCLUSIVE Christmas Cocoa Speciality Designer Series Paper. This gorgeous paper features varied designs, some of them featuring luxurious flocked textures, but it is only available as part of this promotion (and while the stocks last), so don't miss out. The set comes in both wood and clear mount as well.

The Gifted Bundle includes the Gifted Stamp Set and a pack of our Jolly holiday DSP and also comes in a choice of wood or clear mount.

The Season of Joy Bundle includes the stamp set in wood mount and one of our Stampin' Around Wheels, which are so quick and fun to use. Similarly The Delightful Decorations Bundle includes the set in wood mount and the fantastic Ornament Punch (mine has had so much use, and I'll be showing the results next week, after convention)

And don't forget, all of these bundles come with a free reel of the exclusive ribbons - but again, these are while stocks last, so don't miss out!


Larger images can be seen on the Stampin' Up! website, by clicking on the photos there.
Contact me to order, or to arrange your party, and remember, all orders over £150 receive the usual free Hostess sets and free products, so it could be a great time to indulge.

Do have a wonderful Bonfire Night, be safe and I'll see you next week!

Friday 22 October 2010

Peterborough

I really can’t say thank you enough to the lovely ladies Monica and Bekka, who organised this training day. There were insightful talks on various elements of running an SU business, and some wonderful projects.

The things we made were useful, clever and so lovely. And with Linz and Jo demonstrating all the great ways you can use Stampin’ Up!s various punches, I came away full of ideas. 

Our first make of the day was this fantastic set of cards


All made from the ONE stamp set – proving the wonderful versatility of our stamps (not to mention the fantastic imaginations of our organisers).


 All five of these cards were made in a few minutes each with the single stamp set, one type of ribbon (the Whisper White Organza, which is so soft and silky and looks beautiful however you use it, and fabulous value at only £5.25 for a 13m roll!)  and one type of embellishment, in this case, our Basic Rhinestones, which are lovely sparkly little finishing touches.

The cards use a variety of techniques and materials, from using spritzers to making fancy folds – if you want to know how to do any of these techniques or re-create any of these cards or elements from them, contact me and I’d be happy to show you!


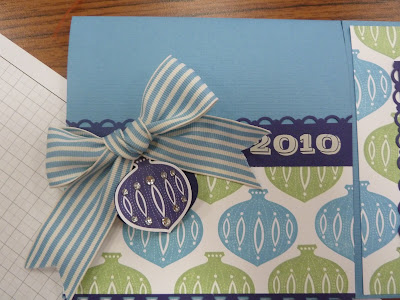
 We also made this gorgeous mini album (photo above is Bekkas sample) Suitable for a few photos, it would make the perfect gift to send to friends and family overseas and is so easy to do, as it is based on just one sheet of 12x12” paper! 


 I love the decoration on the front – the ornament stamp and its coordinating punch are used in such a great way. You simply stamp, punch, fold each punched shape in half vertically and glue each half back to back with its neighbour.
Any glue will do, but a wet glue like Tombow or PVA works best - I tend to apply it with a latex make up sponge to get a fine coating on the back of your peice and avoid splodging glue everywhere. Though a little splodging is always fun.


The backgrounds were made using stamps from the
Contempo Christmas set on Whisper White Cardstock (no DSp in sight!), and the borders decorated with the Scallop Trim Border Punch (a punch which deserves a workshop of its own). Some ribbon and rhinestones and voila! Mine differed quite a bit from Bekkas original, I managed to confuse myself whilst working from the photo's, as the original was in such demand.


The individual ornaments and trees were cut out (the ornaments using the Ornament Punch taking a matter of seconds, the trees by hand taking a wee bit longer) and popped up on foam dimensionals, being careful to avoid sticking them directly to the photo 'plate' meaning that your photo's could easily be inserted afterwards.

The colours used were Marina Mist (the background paper, striped grosgrain ribbon and paler blue stamping) Wild Wasabi and The new In Colour Concord Crush.
Have you guessed by now that alliteration is a big thing in the world of Stampin' Up!? Its sweet, and only becomes a problem when you find yourself referring to various colours as 'Pirouette' (pink) 'Celery' (Green) and 'Concord' (the luciousdeep purply blue used in the album)Confusing, but fun.


  Again, for a demonstration of this and all the other exciting applications, just contact me and book a party.


There was also a lovely little 4x4" card box designed by Monica, which I simply haven't had time to glue together. When I get back from Inverness (for that is where I shall be this weekend, cooing and burbling over our friends wee baby) I shall finish it and post it for you to see, because it is gorgeous, and a whole new colour scheme based on the same Marina Mist paper as used in the album.

Halllooooo!

Ok, it's been a little while, but lots and lots to show.


I also didn’t report on my first party! Huge thanks to my lovely hostess, she did a great job, and also thanks to my mother who took on heat gun duties for the evening! They’ve since received their orders – including the free exclusive hostess sets and the free products of their choice, which I’m sure they are having fun playing with. It was a small and extremely enjoyable party (which just proves how easy it is to earn the freebies) with some fab people and we made some Christmas cards using the Dasher stamp and lots of glitter – because if you can’t have glitter at Christmas, when can you? ;)

Since then I’ve been busily making swaps for the Peterborough training and I also held a stall at the Willingale fair. I met some wonderful people and had loads of fun crafting with children from the village and talking to their families. They were all positively brilliant, and the children so creative and imaginative.

All that fun (plus that fact that this years catalogue includes some brilliant child friendly designs) means i'm working on a range projects for childrens parties and groups and will let everybody know the details when they are available.  


 Do watch this space; it’s going to be exciting!


After that came Peterborough. You know how I mentioned I was doing those swaps? Well they featured these little things –


They’re called Tato’s, which are little origami containers that are flat and so can be used in cards and scrapbook pages and and anywhere else where something small and precious needs to be stored.  they're opened by pulling the two larger flaps, yet stay securely shut otherwise.

They were made using the instructions in Paper Fold It by Steve and Megumi Biddle. I’m going to attempt to make a video showing how to make them and post it here, but do find the book if you can for all the other lovely projects. 
The Tato’s above are made with a 4x4” square of Greenhouse Gala DSP and a 6x6” square of Blueberry Crisp (which I’m starting to absolutely love the floral patterns are so pretty, yet not overtly girly, and a lot of the other patterns would make wonderful mens projects).
My swaps used the Greenhouse paper and were mounted on a page stamped with my Baroque Border Wheel. Using the Wheels is so amazingly quick and easy – all thirty were done in a matter of minutes. Even With me chaging my mind on positioning halfway through and going back to stamp on the reverse.


The one downfall of these swaps was I didn’t list my materials, so for my fellow Demo’s, I used
Very Vanilla, So Saffron, Baja Breeze, Early Expresso and Pumpkin Pie Cardstocks.
Greehouse Gala Designer Series Paper.
Baroque Border Stampin’ Around Wheel
Ink Cartridges inked with So Saffron and Certainly Celery and Certainly, Baja, Saffron and Crumbcake inkpads.
Certainly Celery 1/8” Taffeta ribbon.


I also have to show this card to show off the Paper Daisies that I recently got for my grandmothers birthday card – Just a little bit of inking to colour and the effect is lovely, especially combined with some pretty Whisper White Taffeta Ribbon. 


Next post will be all about the fantastic day I had in Peterborough on the 17th - it was so much fun, and so tiring – those ladies make you work! – But I loved every minute. :D

Sunday 3 October 2010

And here It is!

 The Brand New 2010-11 Idea Book & Catalogue - now bigger and better!


As well as all the new ideas you'll find inside, there is the brand new colour ranges,  improved punch styles and increased range of shapes, new (and I have to say lovely) Hostess sets to choose from and a fantastic
new starter kit offer for anyone who wants to become a demo themselves (which I'll post more about soon).


I'll be putting up a link to the PDF version of the catalogue, but with all the changes to the products I can absolutely recommend getting a catalogue of your own to look through - with feet up and a cup of tea on hand. ;).


Until the end of October I'm making them available at the special price of £4.00, that's over 25% off the recommended price!

If you would like your own copy then contact me - serendipitystamping@hotmail.co.uk.

Wednesday 29 September 2010

Almost time.

October 1st is almost upon us, time for the new catalogue!

And hopefully, if my technical expertise does not fail me, some little upgrades to this blog.

Sunday 5 September 2010

I'm afraid I just can't contain myself...

I have to say something about the new catalogue!

So while Stu battles monsters whilst clad entirely in black rubber (at least, in his Batman Xbox game) and the kitty grouses at the fly that has dared taken shelter in her house for the night, its probably a good time to tell all.

Well, not quite all. I'm honour bound to sit on it - figuratively speaking thankfully - until its official launch on the 1st of October. But, perks of the job, us demo's get a month in advance - to pour through, paw literally, coo over the new designs and squee repeatedly over all the amazing pretties. Aaaaaalllll the fabulous, pretty things. Midnight on September 1st I'm sure they could hear the collective squee'ing back in the American headquarters.

I will let one thing slip - Nicola, BEWARE PIRATES! (yarrrgh, me hearties, and such and such).


Some exciting new introductions with this catalogue are clear stamps. Still the same high quality rubber for crisp stamping, they come instead with 'cling' backing for temporarily adhering to your crystal clear acrylic block. As well as the increased ability to judge your placements, they offer benefits in the form of reduced storage needs - each set will arrive in a box the size of a DVD sleeve, allowing storage on conventional shelves, and one set of acrylic blocks is enough for however many stamps you buy!

The last benefit, which i'm sure you'll all love, is the price! After an intial investment in your arcrylic blocks, each clear mount set is less than the equivalent wood mounted one! And as your blocks will last years, they keep getting better and better value the more sets you buy.

Hang on, thats actually girly logic isn't it? Maybe don't use that argument on your SO's.

I'll put my hands up and admit it took me a little while to wrap my noggin around the ins and outs of the clear stamps, so amongst other things, i'm going to try and get together a handy hints and tips page.


Colours!

Other exciting changes include an increased range of punches, and ribbons and of course the Colour Renovation.

A lot of people have mixed feelings, but aside from the loss of the lovely Blush Blossom i'm really not worried! Plus, the lovely people at SU this year have bought out the Colour Coach - a handy swatch of all 40 colours, arranged so that you can flip out individual colours and play with combinations to your hearts content. And if you get really really stuck, each card will have handy suggestions on the reverse. I can tell already its going to become an indespensible tool.


So many things to look forwards to! If you want to get your catalogue as soon as its launched, do drop me a line and request one. They are priced at £5.95, but i'm sure for pre orders, I can do them for somewhat less than that. :D

Have fun till then.

Wednesday 25 August 2010

And following swiftly on...

I can tell this is not going to be a regular as clockwork blog!

This particular blog has been partly delayed by our holiday to Cornwall, which was stunningly gorgeous and fun to drive around (very hilly!)
On the way there we saw Stonehenge and whilst there we visited Heligan Gardens, the Eden Project, Lands End, Fowey for the Regatta, Tintagel Castle and Poldark Tin mine, where we went on the ghost tour. I can recommend all of it and I got lots of photos including, funnily enough, Dahlias.


Which seem to be almost the opposit to the ones in the earlier blog...

May have to experiment.


Cake Boxes


It was mostly delayed however by the desire to get a set of the cake boxes made up and photographed. But I fear I must admit that my inspiration is failing me. I will get them done soon though - perhaps the impending BRAND NEW 2010-2011 Idea Book and Catalogue will inpire me?

(can you tell i'm getting *very* excited?)


So I made up the templates of the round ended cake boxes, and in the meantime my darling DF got me a gift - a Silhouette craft cutter! I leaped about, promised him a crown for being the worlds best boyfriend and as soon as it arrived started playing!

It sounds just a little like you are torturing a Transformer but i'm getting the hang of it and for starters made GSD versions of the boxes. I'm afraid like the cake boxes, I can't take all the credit for the heart topped box - I saw something like it in a shop, ran home and did my best to recreate it, so the template is mine but the idea really isn't.

So here they are - please, take them, make them up and show me your wonderful creations, and perhaps your imaginations will spark my own.

Large Cake Box
Large Cake Box.GSD
Medium Cake Box
Medium Cake Box.GSD
Small Cake Box
Small Cake Box.GSD
Heart Topped Favour Box
Heart Topped Favour Box.GSD


As they are .GSD and .jpeg files not all places will host them - do let me know if you have issues with this site and I can email them direct. The cutting files have no fold lines on them of course, so use the normal template files as a scoring guide.

Good luck, and let me see photo's!

Friday 30 July 2010

Just a quick one


I thought I would very quickly show a couple of the cards that I made over the past few weeks. The first was one made for the daughter of my DF boss, who was described as very girly and into horses.

I found some images of horses on the internet (thank you whoever took them!) And of course i'd just ordered the Tea Party DSP which covered the 'girly ' element brilliantly.

It turned out that this particular horse was virtually identical to the horse she currently kept, and so i kept it full colour and changed my mind immediately to make an aperture card framing it. Cutting round all the different shapes was quite labour intensive, and if I were making multiple cards I would have thought twice, but as it was a special one off I went full steam ahead.


I made one boo boo though and so an extra little flower was cut out to hide the smudge of elegant eggplant ink that made it onto the sentiment panel (stamp from the Cheers and Wishes set). Finishes it off though? I also trimmed down the flowers on the front to the edge of the main card, allowing it to stand. They loved it, and I was very glad!


The other card was the happy result of an unexpected flash of early morning creativity - one cup of tea and the Bird on a Branch stampt set later and I was rather pleased with it.


I added just a subtle bit of glitter behind the bird, darkened with elegant egglant inking under the heat and stick powder.


And also double inked the sentiment with a light and dark colour (using the faithful Stamp-a-ma-jig) to produce the shadowed effect, which
on the Basic Grey background works beautifully.
Finished of with a liberal daubing of Versamark
around the edge and a frame of black to make the
colours pop out and I was very pleased.


And of course, a bit of Elegant Eggplant grosgrain ribbon, because i'm obsessed.


One day I will have a go at producing a range of items featuring no EE colour at all - as an exercise in restraint!

Tuesday 27 July 2010

Exciting News!

For August, Stampin' Up! are promoting the Two Step stamping sets, including the very lovely Bird on a branch, which I shall do my upmost to aquire and show soon, as it has been on my wish list from the start! The 20% off means its a fantastic time to host your party, as you'll get even more from your rewards than usual!

See the flyer for more details and if you have any questions do feel free to contact me via my email!

Thursday 22 July 2010

Getting up and running

After a far longer than planned gap I've decided to show you a little of what i've been doing since I first discovered Stampin' Up! and the wonderful world of papercrafting.

So I shall start with the pretties!

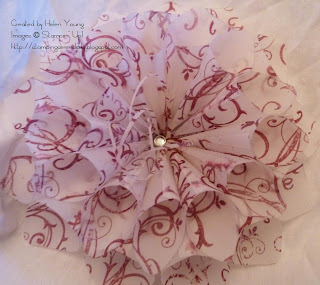
These were inspired by Katou's lovely gift boxes, complete with these folded dahlias made from Tea Party designer series paper (which I literally just got and I'm completely in love with!)

They were printed using the Bella Toile background stamp and the large flourish from the Baroque Motifs set. Stamped on vellum in the new season shade Rich Razzleberry - which I'm in wonderful danger of overusing - they have a lovely old time look and finished with a Rhinestone Brad they have just a little bit of sparkle to finish them off.

I'm not so pleased with the strips of paper in the middles though - apparently if you catch vellum on a bad day you will never get it to curl!

But I'm endeavouring to learn the secret and will share when I do.

The Dahlias are made from squares of your chosen paper, folded into a cone to form each 'petal', they are then glued to a scalloped circle, to form the shape. More detailed instruction are on Katous site, with the English translation under the French.

The smaller of the two was made to the original sizes (2" and 1.5" squares, with the only difference being that I rounded the outer corners first with a punch and finished by sponging Rich Razzleberry onto the outer edges to darken them. The second was made with 3" and 4" squares, again with rounded corners but no sponging - letting the Baroque Motifs speak for itself!
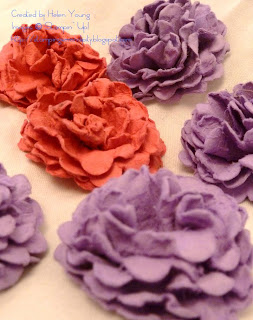
Incidentally I found that a lovely life-like petal colouring was achieved by sponging the (still flat) paper first in 'wiping' gestures off the edge of the paper, then in 'dabbing' gestures afterwards.
(holding the petal between your thumb and forefinger with your thumb pointing toward the rounded corner gives it some support so that it doesn't crease) You could also build up a very dense amount of colour, giving a dramatic effect.


The picture below shows this a little, but the flower that shows it best was adopted very quickly by my partners mother - photo's when I get it back, I promise.
Before I sign off i wanted to show these, which I saw and had to have a go at, again I've given them just a bit of sparkle with a rhinestone brad. They are originally by the amazing paper flower maker Joanne and there's a great video showing you how to make them here.


Next time I'm hoping to post the cake box templates I've made. Why more cake boxes with the plethora available on line already? Well I couldn't find one with a rounded outside edge, and something in me just needed a rounded outside edge. I've also done them in three different sizes, for easy tiering.

Some of the other bits I've been doing, including the voucher wallet made for my dear fellas birthday today are conical favour boxes, pop up cards for a friends daughters birthday and hopefully, lots of invitations for a wedding fair stall coming up in September, which i'm doing with Caroline who is very good at them -so watch out for them.


Until then, have fun.