Happy New Year to you all!
I hope you all had a wonderful Christmas period. With the snows driving everyone barmy it was a little hard for most people but I hope that in the end you all got to be with the people you loved.
I have no idea where the time goes. My last post promising the tutorial for the onion objects was on the 15th November! So long ago now, yet it seems just yesterday almost - is it a sign that i'm getting old?
Well after attempting to photograph the making of the ornaments step by step I realised it wasn't really clarifying anything. What I will do is point you all to my source on the Fire Mountain Gems website. I found and printed this idea out what must have been years ago, and i'd had the instructions sitting in my idea folders (doesn't that sound organised?) until Stampin' Up came along.
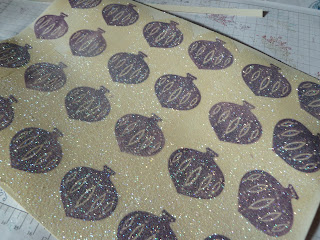
 I started by doing a whole lot of stamping and glittering! The paper for the strips was stamped in Serene Snowflakes in Perfect Plum, Baja Breeze, and Crumb Cake. Using the smallest snowflake I also stamped in Versamark then using the Heat and Stick Powder and the Dazzling Diamonds added some glitz.
 I wasn't too careful at all with placement - I started with the largest and worked down letting the snowflakes overlap and go a bit crazy, as they do naturally!
I then cut these into strips about 8mm wide, and pierced holes in the middle and at each end. It took 8 strips per ornament, and I managed to get about 3 and a bit ornaments per page.
The centre piece was made with the ornament stamp from the Contempo Christmas Set, stamped in Perfect Plum. This time I covered the whole surface of the stamp with H&S and glitter, before punching it out with the Ornament Punch.
I used 4 punched shapes, folded in the centre and glued back to back in order to get the 3d effect. Before 'closing' the shape I slotted it onto the ribbon to float just above the base. If you wanted you could first thread a bead onto the ribbon and place the shape directly onto it.
I finished both the base and the top with a 1" punched circle in Plum and Boho Blossoms punched from various offcuts. Then tied the ribbon in a knot whilst pushing the onion into shape) and trimmed the ends to finish.
I was pleased with the results, and liked the colour scheme so much I ended up using it for my Christmas cards this year!
Sadly the Ornament Punch is currently unavailable. Stampin' Up! made the decision to withdraw it from sale whilst they investigated issues that some customers had experienced. With any new product style there are going to be teething issues, and as soon as its available again i'll let you know, as I discovered a technique to make the most beautiful Magnolia-like flowers with it - not just a Christmas punch!
I also hope that its back soon as these bookmarks were so much fun to make - using the same materials and technique as for the centre of the ornament, I simply used 6 shapes and sandwiched a length of Organza ribbon between the two halves. To glue them I used tombow applied with a sponge or dauber, as it left a fine, even layer of glue right up to the edges, which was just perfect for this purpose, and prevented messy splodges.


Now that i've made one style I want to make more and more - I had a though of using the Bird punch to make a spring inspired version with the Sale-A-Bration 'Sweet Summer' set, which lends itself beautifully I think.
A few tips I picked up though would help anyone trying to make these.
- Its easier to arrange the strips of paper flat and glue them into place before gathering them at the top - My strips seemed to want to all hang out together and whenever one was moved all the others followed suit - much frustration! It also seemed to make the beads between each strip behave better - thought why is a mystery!
- Pre pierce the holes at the top whilst the paper is flat - it stops the paper creasing and makes the finish neater.
- Avoid creasing the paper, getting it wet or resting any weight on it - the shape relied on the curve of the paper so try and preserve that. When I make more I'm thinking of using a bit of acetate to support the paper strips.
Well tomorrow is my day to get cracking with Sale-A-Bration - a fantastic promotion which means you get a FREE set from the exclusive range with any order over £45! I've already managed to get the lovely Bliss set just by ordering essentials. (Ok, so rhinestones weren't essential to anything but my love of sparkle, but hey...) Theres also free sets available for qualifying workshops, so its a great time to get everyone together and get crafting!
I'm hoping to get them done before sundown so they can be photographed and I can update you all tomorrow - see you then!
x


These are lovely Helen! They were certainly worth the wait, will have to make some of those next year to hang in the window.
ReplyDelete