I really can’t say thank you enough to the lovely ladies Monica and Bekka, who organised this training day. There were insightful talks on various elements of running an SU business, and some wonderful projects.
The things we made were useful, clever and so lovely. And with Linz and Jo demonstrating all the great ways you can use Stampin’ Up!s various punches, I came away full of ideas.
Our first make of the day was this fantastic set of cards
All made from the ONE stamp set – proving the wonderful versatility of our stamps (not to mention the fantastic imaginations of our organisers).

All five of these cards were made in a few minutes each with the single stamp set, one type of ribbon (the Whisper White Organza, which is so soft and silky and looks beautiful however you use it, and fabulous value at only £5.25 for a 13m roll!) and one type of embellishment, in this case, our Basic Rhinestones, which are lovely sparkly little finishing touches.
The cards use a variety of techniques and materials, from using spritzers to making fancy folds – if you want to know how to do any of these techniques or re-create any of these cards or elements from them, contact me and I’d be happy to show you!
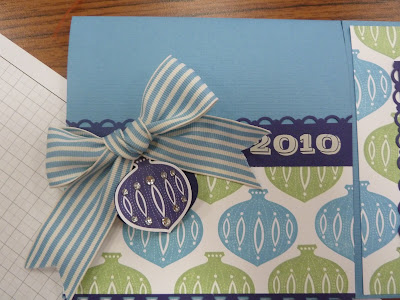
We also made this gorgeous mini album (photo above is Bekkas sample) Suitable for a few photos, it would make the perfect gift to send to friends and family overseas and is so easy to do, as it is based on just one sheet of 12x12” paper!
Any glue will do, but a wet glue like Tombow or PVA works best - I tend to apply it with a latex make up sponge to get a fine coating on the back of your peice and avoid splodging glue everywhere. Though a little splodging is always fun.
The backgrounds were made using stamps from the
Contempo Christmas set on Whisper White Cardstock (no DSp in sight!), and the borders decorated with the Scallop Trim Border Punch (a punch which deserves a workshop of its own). Some ribbon and rhinestones and voila! Mine differed quite a bit from Bekkas original, I managed to confuse myself whilst working from the photo's, as the original was in such demand.
The colours used were Marina Mist (the background paper, striped grosgrain ribbon and paler blue stamping) Wild Wasabi and The new In Colour Concord Crush.
Have you guessed by now that alliteration is a big thing in the world of Stampin' Up!? Its sweet, and only becomes a problem when you find yourself referring to various colours as 'Pirouette' (pink) 'Celery' (Green) and 'Concord' (the luciousdeep purply blue used in the album)Confusing, but fun.
Again, for a demonstration of this and all the other exciting applications, just contact me and book a party.
There was also a lovely little 4x4" card box designed by Monica, which I simply haven't had time to glue together. When I get back from Inverness (for that is where I shall be this weekend, cooing and burbling over our friends wee baby) I shall finish it and post it for you to see, because it is gorgeous, and a whole new colour scheme based on the same Marina Mist paper as used in the album.


No comments:
Post a Comment